
Integrating Selenium Tests in CI/CD Pipelines Using Jenkins & GitHub
This blog post will guide you through the process of seamlessly integrating your Selenium test suite into a CI/CD pipeline, leveraging the power of GitHub and Jenkins.
.avif)
In the fast-paced world of software development, delivering high-quality applications rapidly is paramount. Continuous Integration (CI) and Continuous Delivery/Deployment (CD) pipelines are the backbone of this agility. But what about ensuring your application's user interface (UI) remains robust and functional with every change? This is where integrating your Selenium automated tests into your CI/CD pipeline, powered by GitHub for version control and Jenkins for orchestration, becomes a game-changer.
This blog post will guide you through the process of seamlessly integrating your Selenium test suite into a CI/CD pipeline, leveraging the power of GitHub and Jenkins.
Why Integrate Selenium Tests into CI/CD?
Before we dive into the "how," let's understand the immense benefits of this integration:
- Early Bug Detection: By running Selenium tests with every code commit or merge, you catch UI regressions and functional bugs much earlier in the development cycle, significantly reducing the cost and effort of fixing them.
- Faster Feedback Loop: Developers receive immediate feedback on the impact of their code changes on the UI, allowing for quick rectifications and preventing issues from snowballing.
- Enhanced Software Quality: Continuous testing ensures that your application's UI remains stable and performs as expected across various browsers and environments.
- Increased Confidence in Releases: Knowing that a comprehensive suite of UI tests has passed gives teams greater confidence in deploying new features or updates to production.
- Reduced Manual Effort: Automating UI tests eliminates the need for time-consuming and error-prone manual testing, freeing up QA engineers to focus on more complex exploratory testing.
- Scalability: CI/CD pipelines, especially with Jenkins and Selenium Grid, enable parallel test execution across multiple browsers and environments, drastically cutting down test execution time.
Prerequisites
Before we begin, ensure you have the following set up:
- Selenium Test Suite: A working Selenium test automation framework (e.g., Maven-based Java project with Testing/JUnit, Python with Pytest, etc.) pushed to a GitHub repository.
- GitHub Repository: Your Selenium test automation project hosted on GitHub.
- Jenkins Instance: A running Jenkins server (either on-premise or cloud-based).
- Java Development Kit (JDK): Installed on your Jenkins server (if your Selenium tests are in Java).
- Maven/Gradle (or equivalent build tool): Installed on your Jenkins server (if applicable to your project).
- Web Browsers: Browsers like Chrome, Firefox, etc., installed on the Jenkins agent where tests will run, or a Selenium Grid setup for distributed testing.
- Required Jenkins Plugins:
- Git Plugin: To pull code from GitHub.
- Maven Integration Plugin (if using Maven): To build and run Maven projects.
- Testing Results Plugin / JUnit Plugin (or similar report publishing plugin): To publish test reports.
- Pipeline Plugin: For defining Jenkins Pipelines (highly recommended for CI/CD).
Step-by-Step Integration Guide
Let's walk through the integration process:
Step 1: Prepare Your Selenium Project on GitHub
- Organize Your Project: Ensure your Selenium project has a clear and maintainable structure.
- Use the Page Object Model (POM) for better test maintenance and readability.
- Separate test data from test logic.
- Implement proper waiting strategies (explicit waits) to handle dynamic web elements.
- Consider using a test runner like Testing or JUnit for robust test management, parallel execution, and reporting.
- pom.xml (for Maven projects) / build.gradle (for Gradle projects):
- Include Selenium WebDriver dependencies.
- Include Testing/JUnit dependencies.
- Configure the Surefire Plugin (for Maven) or equivalent for test execution and report generation. Ensure it's configured to generate XML reports that Jenkins can parse.
Example pom.xml snippet for Maven and Testing :
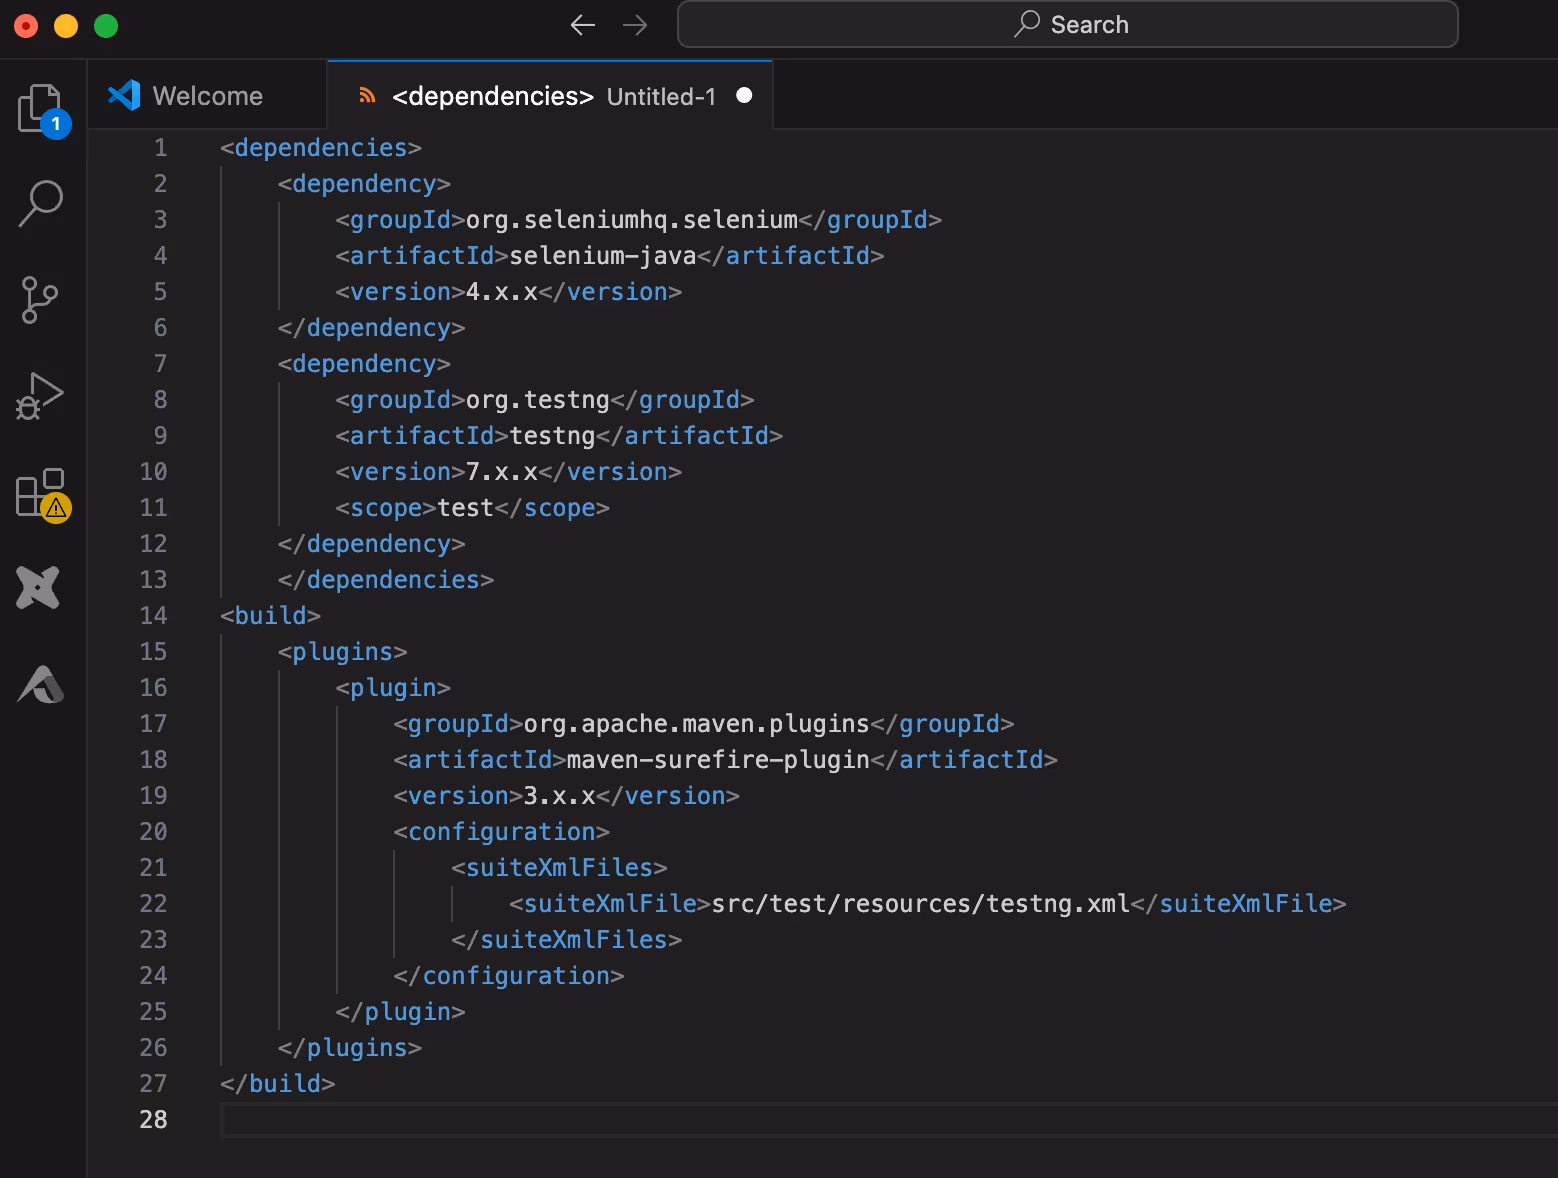
- Testing.xml (or equivalent for other frameworks): Define your test suites and classes here.

Step 2: Configure Jenkins
- Install Necessary Plugins:
- Go to Manage Jenkins > Plugins > Available Plugins.
- Search and install: Git, Maven Integration (if using Maven), Testing Results Plugin (or JUnit Plugin). Also ensure the Pipeline plugin is installed.
- Global Tool Configuration:
- Go to Manage Jenkins > Global Tool Configuration.
- JDK: Configure your JDK installation (e.g., point to JAVA_HOME).
- Maven: Configure your Maven installation (if using Maven).
- WebDriver Configuration (Important for Headless Execution):
- For headless browser execution (recommended for CI/CD), you typically don't need a display server. However, you need the browser binaries (e.g., Chrome, ChromeDriver) accessible to Jenkins.
- Consider using WebDriverManager (Java) or playwright.sync_api.BrowserType.launch() with headless=True (Python Playwright) to automatically manage browser drivers. This significantly simplifies setup.
- If you need a display for specific reasons (e.g., debugging, visual testing), you might need to set up Xvfb on your Jenkins server.
Step 3: Create a Jenkins Pipeline Job
We'll use a Jenkins Pipeline, which defines your CI/CD workflow as code (a Jenkinsfile) within your GitHub repository. This offers version control, reusability, and better visibility.
- Create a New Jenkins Item:
- On the Jenkins dashboard, click New Item.
- Enter an item name (e.g., Selenium-UI-Tests).
- Select Pipeline and click OK.
- Configure the Pipeline:
- Under the General tab, you can add a description.
- Under the Build Triggers section, configure how you want to trigger the pipeline:
- Poll SCM: Jenkins periodically checks your GitHub repository for changes. Set a schedule (e.g., H/5 * * * * to check every 5 minutes).
- GitHub hook trigger for GITScm polling: This is more efficient. You'll need to configure a webhook in your GitHub repository to notify Jenkins of pushes.
- In your GitHub repo, go to Settings > Webhooks.
- Click Add webhook.
- Payload URL: http://your-jenkins-url:8080/github-webhook/ (replace with your actual Jenkins URL).
- Content type: application/json.
- Which events would you like to trigger this webhook?: Select Just the push event.
- Click Add webhook.
- Under the Pipeline section:
- Select Definition: Pipeline script from SCM.
- SCM: Git.
- Repository URL: Paste the URL of your GitHub repository (e.g., https://github.com/your-username/your-selenium-project.git).
- Credentials: If your repository is private, add your GitHub credentials (username/password or SSH key).
- Branches to build: Specify the branch (e.g., main or master).
- Script Path: Enter Jenkinsfile (this is the default name for the pipeline script).
Step 4: Create Your Jenkinsfile
Create a file named Jenkinsfile in the root of your GitHub repository. This file defines the stages of your CI/CD pipeline.
Here's an example Jenkinsfile for a Maven-based Java Selenium project with Testing:

Important Considerations for the Jenkinsfile:
- agent: Specifies where the pipeline will run. agent any means it can run on any available agent. For more control, use agent { label 'your-agent-label' }.
- tools: Ensures Jenkins uses the correct JDK and Maven versions configured globally.
- credentialsId: If your GitHub repo is private, you need to add your GitHub credentials in Jenkins (Manage Jenkins > Manage Credentials > Add Credentials). Then, use the ID you assign to these credentials in the Jenkinsfile.
- Headless Browsers: For better performance and stability in a CI/CD environment, run your Selenium tests in headless mode (e.g., Headless Chrome or Headless Firefox). This eliminates the need for a graphical user interface on the Jenkins server.
- For Chrome, you can typically add ChromeOptions.addArguments("--headless"); to your WebDriver initialization code.
- Selenium Grid: For large test suites or cross-browser testing, consider setting up a Selenium Grid. Your tests would then point to the Grid hub URL instead of local browser drivers. The Jenkinsfile would then include steps to ensure the Grid is running or to connect to an external Grid.
- Reporting: The example above uses publishTestReport() for Testing results. You can also integrate with tools like Allure Reports for richer, interactive test reports. This would involve adding steps to generate Allure reports and then publishing them as an artifact or using an Allure Jenkins plugin.
- Error Handling and Notifications: Implement post actions for success, failure, and always to send notifications (email, Slack) and clean up workspaces.
Step 5: Run Your Jenkins Pipeline
- Manual Trigger: Go to your Jenkins job and click Build Now.
- Automated Trigger: Push a change to your GitHub repository. If your webhook is configured correctly, Jenkins should automatically detect the change and trigger a build.
Step 6: Analyze Test Results
After a build, you can:
- View Console Output: See the raw output of the build, including test execution logs.
- Test Results (from Testing/JUnit Plugin): The Test Results link on the job page will provide a summary of passed, failed, and skipped tests, along with details for failed tests.
- Artifacts: Download any archived reports (HTML, screenshots) from the Build Artifacts section.
Best Practices for Robust CI/CD with Selenium
- Stable Locators: Use robust and stable locators (IDs, unique attributes) to minimize test flakiness.
- Explicit Waits: Always use explicit waits to handle dynamic elements and avoid race conditions.
- Page Object Model (POM): Essential for maintaining large test suites.
- Test Isolation: Ensure tests are independent and do not rely on the state of previous tests.
- Parallel Execution: Leverage Testing's parallel execution capabilities or Selenium Grid to speed up test runs.
- Comprehensive Reporting: Integrate with tools like Allure Reports for detailed and visually appealing test results.
- Screenshots on Failure: Capture screenshots automatically when a test fails to aid debugging.
- Environment Configuration: Parameterize your test environment URLs and credentials, storing them securely in Jenkins.
- Version Control for Jenkinsfile: Keep your Jenkinsfile in source control (GitHub) to track changes and enable collaborative pipeline development.
- Monitoring and Alerts: Set up monitoring for your Jenkins builds and configure alerts for build failures to ensure prompt attention to issues.
- Regular Maintenance: Just like your application code, your test automation suite requires regular maintenance to keep it relevant and efficient.
Conclusion
Integrating Selenium automated tests into your CI/CD pipeline using GitHub and Jenkins is a powerful step towards achieving faster, more reliable software releases. By automating UI testing, you empower your development and QA teams to catch bugs early, maintain high quality, and deliver exceptional user experiences with confidence. Embrace this synergy to unlock the full potential of your DevOps initiatives.
Share
Related Blogs

AI systems are powerful but lack persistent memory, often “forgetting” context across sessions. This blog explores how Knowledge Graphs, Cognee, and Model Context Protocol (MCP) work together to solve AI amnesia, enabling structured memory, contextual reasoning, and seamless AI-to-data connectivity.
What started as a small limitation in a client Streamlit project turned into a widely used open-source Python library. This is a practical story about learning beyond comfort zones, building what doesn’t exist, and how real-world problems can create value far beyond a single project.
%20Choosing%20Between%20Apache%20Iceberg%20and%20Delta%20Lake.jpg)
As data lakes scale and power AI-driven analytics, schema evolution has become a critical engineering challenge. This blog explores how Apache Iceberg and Delta Lake enable teams to manage schema changes safely, without breaking pipelines, analytics, or trust in data.